Hp Tuners L5D Medium Duty Unlocked Ecm Install Instructions
These steps need to be completed before you start the swap process.
If you see your vehicle's VIN at the top of the window you can skip this step.
Do not swap in modified ECM until told to do so!
Download & Install .Net Windows Runtime 8:
Download & Install the latest VCM Suite Beta:
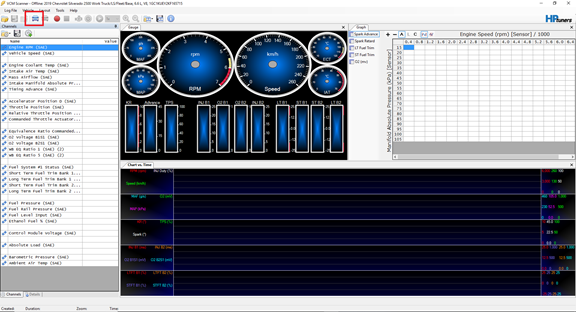
- In VCM Scanner click on the blue circle with the white I on the top, when the new window opens, hit the same icon within the window that pops up.
- Hit the save button in that window and save it as your name and your VIN number, send that file to the appropriate team member and stockfile@duramaxtuner.com
-
We will make a new base file from your info log. In a worst case scenario this can take up to 1-2 business days. Please do not proceed until you receive this from us.
-
When you receive your base file from us, you may proceed with the swap process.
ECM Swap Procedure
Prior to removing your factory ECM
- Open VCM Scanner on your computer. Plug your MPVI2 into your laptop first & then connect your MPVI2 to the vehicle’s OBD2 port with the stock ECM installed.
- Turn the key to the Run position, two clicks forward (key on, engine off)
-
Select the Vehicle Icon that says “Connect to Vehicle” on the top items bar.
- Select “Vehicle Controls & Special Functions”
.png?width=589&name=image%20(1).png)
-
Select the "System" tab
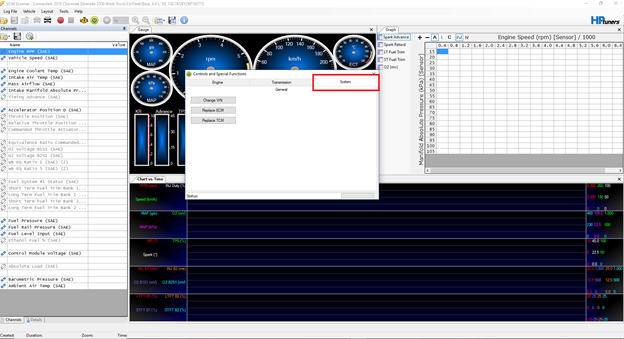
-
Click “Replace ECM” To start the function
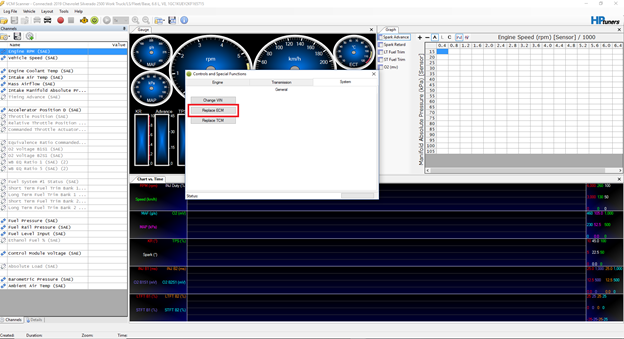
- It will again ask you if the stock ECM is installed, click "Yes"
- ECM Data Read Successfully. Click "Okay"
- You may now replace the stock ECM with the provided unlocked ECM
Post unlocked ECM installation
For 2017-2019 models the Factory ECM is located behind the driver’s side headlight, in between the battery and the power steering pump. It is fastened with 1 christmas tree clips or 2 10MM bolts.
It is easiest to remove the 2 most forward connectors before trying to pull out your ECM, and leaving the 3rd one connected until it is free and brought up where you can see it above the radiator hose.
The connectors themselves have a lock that needs to be slid forward, pushed down, and at that point you can lift up the locking lever which will also push away from the ECM.
The TCM is the same style connector and is mounted on the the Firewall for 2017 Trucks or on the fan shroud for 2018-2019 Trucks.
For 2020+ Models the ECM is located in the driver side wheel well. The easiest way to access this is by jacking up the front, driver's side of the truck just enough, where the suspension extends but does not lift the wheel off the ground. Remove the factory fender liner (you can leave the fender flare attached)
Open VCM Scanner on your computer and turn the ignition on. (turn key 2 clicks forward without starting the engine)
- Select the Vehicle Icon that says “Connect to Vehicle”

- Go to “Vehicle Controls & Special Functions”
.png?width=589&name=image%20(1).png)
- Change Vin. Insert your vehicle's vin number. “Okay”
If you see your vehicle's VIN at the top of the window you can skip this step. - Go to “Vehicle Controls & Special Functions”
.png?width=589&name=image%20(1).png)
- Select the “Systems” Tab.

- Click “Replace ECM” To start the function.
- It will again ask you if the stock ecm is installed. This time select “NO”. → Have you installed the new/replacement ecm? → YES.
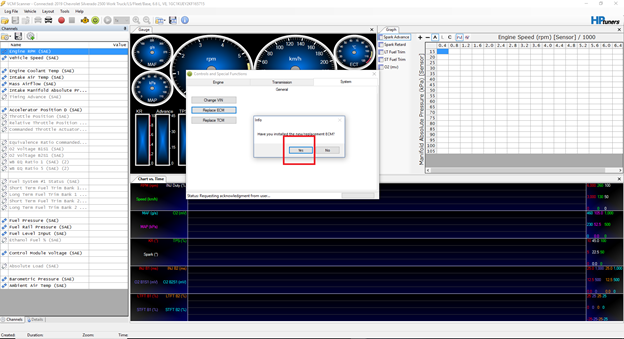
- ECM Replacement Complete.
- Open the base file we emailed you in VCM Editor. Some trucks may get a SPECIFIC LIC FILE. This is very important to LIC. If you do not choose this you could lose your credits.
- For the first time flashing with your LIC FILE, Select License File Specific. You can then select the "DO NOT WRITE" drop down, then hit "Write"(this is essentially the okay button). Your MPVI2 is now married to the ECM.
- When flashing your mod file, open the file from the tuner.
- Select “Write Entire” for ECM
- Once the flash is complete start the vehicle and make sure there are no messages on the dash or check engine lights. We recommend driving the truck a few times to go through a few key cycles as well as a few hot & cold soaks to make sure there are not pending codes. If there are no messages or check engine lights after a few key cycles and you are on a base file, request your mod file from the tuner. If you already have your SOTF mod file you are good to go!
DEPENDING ON THE ORDER, at some point in the process you may be asked to provide a Stock Read.
- To read your ECM, open VCM editor. Make sure no other files are open in hptuners and you should be able to select the green read arrow in the top center.
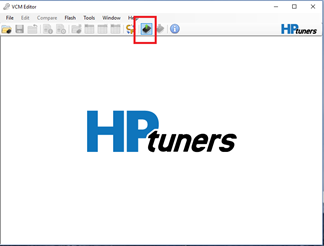
- A new window will open up. In that new window make sure to select read entire for the ECM.
- Once the read has finished, save that file to your computer somewhere you can find it later.
- Email that stock file to us at stockfile@duramaxtuner.com. Include your name, order number, and vin number in the email. Once we receive that stock file we will build your tune files and email them back to you. You will get the tune files from a noreply@duramaxtuner.com email address. You should receive those files usually withing 1-2 business days of us receiving your stock read.
Flashing Tune Files Onto Your ECM
- To flash your tune files onto your ECM, open HP Tuners VCM Editor.
- Open the tune file you wish to flash onto the ecm.
- Select "Write Vehicle" (red arrow down).
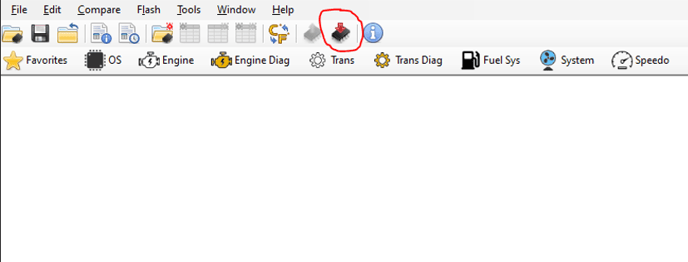
- A new window will open, in that new window select write entire for the ECM. Then click "Write".
- Once the flash has finished follow the on screen prompts to finish the process.
The tune has now been flashed onto your vehicle and you are all finished with the process.
If you have any further questions or didn't find an answer to the question you had in this article, click here and fill out the form and one of our Remote Support experts will be in contact with you.